Showing posts with label recipe. Show all posts

Friday, May 10, 2019

Proven Butter Chicken

I combined a few different recipes to churn out this utterly delicious butter chicken, and I am so impressed I feel the need to record the recipe so I can go back to it again.
INGREDIENTS (Feeds 6)
2 lbs of chicken thighs
1 pint Heavy Whipping Cream
2 Tbsp butter
15 oz tomato sauce
2 tbsp garlic
1/4 med onion
3 tsp turmeric
2 tsp ground ginger
1 tsp coriander
2 tsp garam masala
2-3 tsp chili powder
1 tsp ground cinnamon
1-2 tsp curry powder
cilantro to taste
golden raisins
salt and pepper

Directions
1. Cut the chicken into bite-sized chunks and generously coat them in half the turmeric, ginger, salt
2. Heat a skillet to medium heat and brown the butter, add the onions and garlic. Cook until translucent and fragrant.
3. Increase the pan temperature to med-high and add the chicken. Cook until almost done (3-5 minutes), add more browned butter if needed.
4. Add heavy whipping cream and tomato paste/sauce will turn a red-orange in color
5. Turn the heat to med-low and cover with a lid for 5-7 minutes
6. Remove the lid and add the rest of the spices. The chicken is fully cooked, reduce to preferred consistency. Add cilantro and golden raisins.


Sunday, July 12, 2015

Cooking

Last week, Meghan and I alternated whose turn it was to cook dinner each night, and the result was that we both ate really well for several days in a row. Or, as my dad would say, we were eating like kings!

It was such a delightful experience. I don't cook. At least, not often. I don't really enjoy it. Except, when you're cooking for someone that is as willing to try anything as you are, doesn't complain about the ingredients that you are using, or the time it is taking to make it; when you're cooking for someone who also helps clean up. . . well, I guess it isn't so bad. It was a fun reminder that even though I don't necessarily enjoy cooking, I actually can do it.

The recipes we used are definite keepers, so here they are: 

Crispy Black Bean Quinoa Burritos

from: http://www.twopeasandtheirpod.com/crispy-black-bean-quinoa-burritos/
Yield: 10 burritos
Prep Time: 10 minutes
Cook Time: 25 minutes
Total Time: 35 minutes

ingredients:

1 tablespoon olive oil
1 small yellow onion, diced
1 clove garlic, minced
1/2 cup diced red bell pepper
1/2 cup diced green bell pepper
1 (15 oz) can Libby's Organic Black Beans, rinsed and drained
1/2 cup Libby's Organic Sweet Corn, rinsed and drained
1 1/2 teaspoons chili powder
1 teaspoon ground cumin
1/4 cup fresh cilantro, chopped
Juice of 1/2 lime
Salt and black pepper, to taste
Cilantro Lime Quinoa
2 cups shredded Cheddar cheese
10 burrito-sized flour tortillas
Creamy Avocado Yogurt Dip, for serving (THIS IS A MUST--it was soooo good!)

Directions:

1. In a large skillet, heat the olive oil over medium-high heat. Add the onion and cook until tender, about 5 minutes. Add the garlic and cook for 2 minutes. Stir in the peppers, black beans, corn, chili powder, cumin, and cilantro. Cook for 5 minutes. Add the fresh lime juice and season with salt and pepper, to taste.
2. Place a few spoonfuls of cilantro lime quinoa in the center of a tortilla, leaving a 1/2-inch border around edges, then add the shredded cheese, and bean/corn mixture down the center of the quinoa. Roll burritos, by folding over the ends and rolling up. Continue making the rest of the burritos.
3. Heat a large non-stick skillet or griddle pan over medium heat. Arrange burritos, seam-side down, in pan or griddle and cook until golden brown and crisp, about 2-3 minutes per side. Serve warm with Creamy Avocado Yogurt Dip.
Note: You don't want to fill the burritos too full or they will be hard to roll up. You can also use Cilantro Lime Rice, instead of the quinoa.

Kung Pao Chicken Zoodles For Two

Skinnytaste.com

Servings: 2 • Size: scant 2 cups • Old Points: 6 pts • Points+: 7 pts
Calories: 277 • Fat: 12 g • Protein: 24 g • Carb: 21 g • Fiber: 4 g • Sugar: 9 g
Sodium: 725 mg (without salt) • Cholesterol: 62 mg

Ingredients:

  • 2 medium zucchini, about 8 oz each, ends trimmed
  • 1 teaspoon grapeseed or canola oil
  • 6 oz skinless chicken breasts, cut into 1/2-inch pieces
  • Kosher salt and freshly ground black pepper, to taste
  • 1/2 red bell pepper, cut into 1/2-inch pieces
  • 1 teaspoon sesame oil
  • 2 cloves garlic, minced
  • 1 tsp fresh ground ginger
  • 2 tbsp crushed dry roasted peanuts
  • 2 tbsp thinly sliced scallions along diagonal
For the sauce:
  • 1 1/2 tbsp reduced soy sauce (tamari for gluten free)
  • 1 tbsp balsamic vinegar
  • 1 tsp hoisin sauce
  • 2 1/2 tbsp water
  • 1/2 tbsp Sambal Oelek Red Chili Paste (or more to taste)
  • 2 tsp sugar
  • 2 tsp cornstarch
Directions:
Using a spiralizer fitted with a shredder blade (this makes a thicker noodle), or a mandolin fitted with a julienne blade, cut the zucchini into long spaghetti-like strips. If using a spiralizer, use kitchen scissors to cut the strands into pieces that are about 8 inches long so they’re easier to eat.

In a small bowl, whisk together soy sauce, balsamic, hoisin, water, red chili paste, sugar and cornstarch; set aside.

Season chicken with salt and pepper, to taste. Heat oil in a large, deep nonstick pan or wok over medium-high heat. Add the chicken and cook until browned and cooked through, about 4 to 5 minutes. Set aside.
Reduce heat to medium, add sesame oil, garlic and ginger to the skillet and cook until fragrant, about  30 seconds. Add the bell pepper, stir in soy sauce mixture and bring to a boil; reduce heat and simmer until thickened and bubbling, about 1-2 minutes. Stir in zucchini noodles and cook, mixing for about two minutes until just tender and mixed with the sauce. If it seems dry, don't worry the zucchini will release moisture which helps create a sauce. Once cooked, mix in chicken and divide between 2 bowls (about 2 cups each) and top with peanuts and scallions.

Panko Crusted Chicken Piccatta


Prep time
Cook time
Total time
 
Serves: 4
Ingredients
  • 1 cup flour
  • 3 eggs, lightly beaten
  • 2 cups panko breadcrumbs
  • 4 skinless, boneless chicken breast halves,
  • Salt and freshly ground pepper
  • ½ cup olive oil
  • 6 Tablespoons butter
  • 2 Tablespoons capers
  • 2 Tablespoons lemon juice + A few slices of lemon
  • 1 tablespoon chopped parsley

  • Instructions
  1. Place the flour, eggs, and panko in three separate shallow bowls.
  2. Butterfly the chicken so each piece is half as thick as it was to begin with. Lay the chicken out on a cutting board, cover with wax paper, then use a meat mallet or rolling pin to pound it to a ¼ inch thick. Season both sides with salt and pepper.
  3. Heat half of the olive oil in a large skillet over medium heat. Dredge the chicken breasts in flour, shake off the excess, then dip in the eggs, and coat with breadcrumbs. Add half the dredged chicken breasts to the skillet and fry for 3-5 minutes or a side or until golden brown and cooked through. Remove to a plate.
  4. Add the other half of the oil to the skillet and repeat with remaining chicken breast.
  5. When the chicken has been removed, add the butter to the skillet and use a spatula to scrape up any brown bits (that's where the flavor is!). Let the butter cook until sizzling and just starting to brown. Stir in the capers, lemon juice, and lemon slices.
  6. To serve, plate the chicken then spoon the lemon butter sauce over top. Top with lemon slices and fresh parsley.

Thursday, June 04, 2015

Strawberry Festival Pie

Yes. I made this.

This weekend Troy will celebrate the Strawberry Festival.

Celebrating the Strawberry Festival as a kid was the official way to usher in the summer holiday. For a few years, our ward had a float (that was back then, when they actually did floats) in the parade and I remember stuffing tissue paper into chicken wire to get our floats to match whatever berry silly theme had been chosen for the year. We rode on a few of those floats and even won prizes.

The Boy Scouts in our ward at some point started doing a fundraiser at the Friday night festivities in the downtown square. Friday night was reserved for a children's parade and bed races. There were all sorts of vendors and booths, and the Boy Scouts sold pies. Delicious strawberry pies.

I believe the original recipe came from an older lady in our ward, and throughout the years, my mom and Aunt Elouise in particular, along with the help of women in the relief society, developed the recipe into something that not only tasted better, but was more attractive, and more efficient to make.

The first several years went something like this:

The Boy Scouts would go to Fulton Farms and pick the berries.

The Relief Society would divvy out the jobs from making pie crust shells to glaze and then drop these off Friday morning at our house. (Our house is only three blocks from The Square, and easily accessible through the alleys to the booth set up there.)

Volunteers, be it Boy Scouts, Young Women (mostly Amy and me), and other Relief Society members would meet at our house and top and wash the berries. Then we would pour on the glaze and set up the pies on long tables, which they would set up until they were loaded in the back of a van and driven to Square.

The Boy Scouts would then top them with whip cream, and serve the pies.

Throughout the years, they started doing pre-orders and sold whole pies instead of by the piece. The prices rose. My aunt started working in the school cafeterias and we gained access to nacho cheese and chili meat to put on hot dogs. The enterprise expanded to the point where the health department said that they couldn't be made in our house anymore.

By that point, they were selling a hundred pies at least, with my aunt always pushing to make more. Which could be done as the process streamlined.

Saturday, Amy and I would wake up to the sound of people finding their seats in front of our house, as we were the last street on the parade's route. We would have to move the cars we parked on the street for the day. Members of our ward, school friends, and people we knew would come and find a place on our porch and we would watch and yell at the participants to give us one last performance. (Because we were the tail end of the route, the performers would be tired and ready to be done, and often, we didn't get to hear the bands or watch the dancers.) As a kid, I always loved to see the different pageant queens and courts. Several of my friends competed and won a spot on the Strawberry Queen Court float.

Following the parade, we could go to the levy and walk through the booths. Mostly artisan booths, crafts, and food. There was a duck race at some point, where they would send hundreds of yellow ducks down one side of the river to the other.

Sunday, our regular route to church was diverted because of a 5 or 10k race.

I have good memories of the Strawberry Festival. And it is sad that the last time I was home, the parade had gotten SO lame. It now mostly consists of people driving in cars with a magnet advertising their business. Other changes over the past couple of years also sound sad. No more bed races. A change of venue from the levy. And because of that, a change of procedure for the strawberry pies.

Luckily, not only is the pie famous enough to have the recipe passed down, it's also famously easy to make. I always try to make at least one around this time for a little reminiscing.

I may never be as good as my mom. But I can certainly hold my own. And you can try, too, because here is the recipe:

Strawberry Festival Pie

Pie Crust:
  • 1½ C. Flour
  • ½ tsp. Sugar
  • ½ tsp. Salt
  • ½ C. Oil
  • 2 T. Milk

Filling:

  • 1½ C. Sugar
  • ¼ C. Cornstarch
  • 1½ C. Water
  • 1 box of Strawberry Jell-O (3 oz.)
  • Fresh Strawberries

Topping:


  • Real Whipping Cream
  • Vanilla and Sugar to taste

Crust: Blend and press into pie shell. Create an edge at the top to hold the pie filling. Bake at 400° for 10-12 minutes or until light brown. Cool.
Filling: Mix sugar and cornstarch, add water and boil until transparent (~2 minutes), stirring constantly. Add Jell-O and return to a boil. Remove from heat and allow to cool. It should be cooled quite a bit before you use it. The filling will do one deep pie, and you'll probably have leftover glaze. Just double the recipe for two pies.
Put berries into cooled glaze and stir, coating evening. Pour into cooled pie shell. Refrigerate to set completely. 
Topping: Serve with Whipped Cream.


Sunday, October 21, 2012

Broccoli Soup

I made a delicious soup on Friday night that was SO easy, as well.

The original recipe called for:

1 lb. chopped broccoli
1 small onion
2 cups chicken/vegetable broth
1 can of white beans

You're supposed to cook the onion in a pot in olive oil, then add everything once the onion is ready. Bring the mixture to a boil and then turn down to a simmer until the broccoli is cooked.

And then you are supposed to blend it all up.

Since I don't really like soup that I can drink, I prefer it laden with foods to chew and extra crackers to make it thick, I didn't like the idea of blending it. I also didn't like the idea that it called for nothing to flavor it besides the onion.

So.

I decided to add it a few other things, and it ended up being delicious, as I said.

Take the original recipe:


1 lb. chopped broccoli
1 small onion
2 cups chicken/vegetable broth
1 can of white beans

ADD:
dash of chili pepper
jalapeno flakes
2 cups (roughly) of red cabbage and green cabbage
cilantro to taste

When ready to eat, add a dollop (or more) of Greek yogurt.

I don't know, maybe it sounds gross.....No............... It can't sound gross. It was so good. I'll definitely be eating it again and again this winter. Plus, it's healthy, right?

Tuesday, October 16, 2012

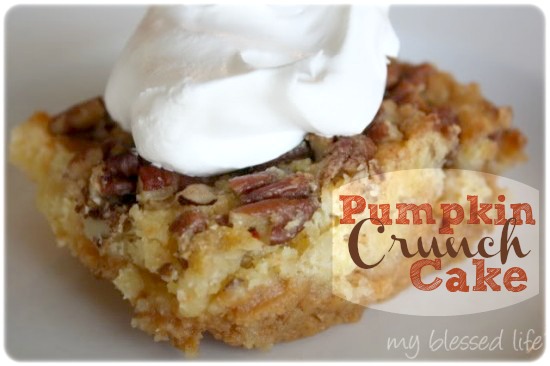
Pumpkin Crunch Cake


My two favorite pies? Pumpkin and pecan. Or, pecan and pumpkin. It's so hard to choose which one to eat when I find myself standing in front of both at the Thanksgiving dessert table. I wasn't thinking about solving this delightful dilemma, (Why not just have one of each? Yes, please!) but that's what this recipe is. A delicious combination of fall's two greatest desserts.

Pumpkin Crunch Cake

1 can (15 oz) pumpkin
1 can (12 oz) evaporated milk
3 large eggs
1 1/2 cups sugar
1 t. cinnamon
1 t. pumpkin pie spice (I don't really know how much I added)
1/2 t. salt
1 box yellow cake mix
1 c. pecans, chopped (I used whole pecans, and they were delightful)
1/2  butter, melted (this is half of what the original recipe used, but I couldn't justify a whole cup; also, I mixed the melted butter in with the pecans, and it didn't hurt the recipe, but I think it is supposed to help with the cake, too)

Cool Whip

Preheat oven to 350 degrees.  Combine pumpkin, evaporated milk, eggs, sugar, spices, and salt in a large bowl.  (I used my mixer for this step.)

Pour into a greased 13×9 baking dish.

Run cake mix through a sifter to get lumps out and sprinkle dry cake mix evenly over pumpkin mixture.  Top with pecans.  Drizzle melted butter over pecans.  Bake for 50-55 minutes or until golden brown.  Cool. Serve chilled (or warm, though chilled is better).  Top with  a dollop of whipped topping.

Enjoy!

Found the recipe here.

Thursday, June 28, 2012

Cinnamon Spaghetti

I've been raving about this spaghetti ever since the taste of it hit my mouth months ago when Ovom was so nice to make it for me.

I've started sharing it with everyone, and so I have now decided to share it with the few others that read my blog that already don't have this in their possession.

It's seriously the best spaghetti. I crave it. I love it. I want it right now.


Spicy Spaghetti
Cooking up some deliciousness.


Submitted by: Meghan

Difficulty: Easy
Prep Time: 10 minutes
Cook Time: 30 minutes
Yield: 4 servings

Ingredients:

1 lb. ground beef or pork
1 can Hunts 4 cheese spaghetti sauce
1 medium onion
1 tsp. chopped garlic
½ c. pepperoncini
1 tsp. cinnamon

1 lb. spaghetti or angel hair pasta  
Salt and pepper to taste.  

Instructions:

Brown hamburger. Dice onion and halfway through the browning process, add onion and garlic. Chop pepperoncini and cinnamon. Add sauce. Simmer for 20 minutes until flavors have melded together.

Cook spaghetti and while hot, toss with 1 Tbl. of butter and some parmesan cheese. Stir into sauce.

Notes:
You might want to start with half the pepperoncini and cinnamon.

Monday, September 12, 2011

Butterbeer Cupcakes

Butterbeer Cupcakes
I have admittedly been super-lax about baking and cooking these days. But every once and a while, I stumble upon some amazing recipes that I want to try, but I'm too lazy to make. Such is the case with the Butterbeer (yes, that's Harry Potter Butterbeer) cupcakes. When I stumbled upon it on pinterest.com, I just passed along the recipe to my friend Megan, and asked her to make me some.

Fortunately for me, she was excited to try them. And happened to have all the ingredients necessary! So today, she came over to my house and made me cupcakes.

As promised, these cupcakes are divine! They are seriously the best cupcakes I have ever tried. And it might have a lot to do with the fact that they are butterscotch flavoured....which I absolutely love. Luckily, Megan took her share away and I shared half of mine with some guys in the ward -- because I know I was tempted to eat them all.


I do not think that it is over the top to think that I will be dreaming of these things tonight!!


Butterbeer Cupcakes - from the Pastry Affair
Adapted from Amy Bites
Yields 18 cupcakes
Butterbeer Cupcakes
2 cups flour
1 1/2 teaspoons baking powder
1/2 teaspoon baking soda
Pinch of salt
1/2 cup (1 stick) unsalted butter, softened
1 cup dark brown sugar, packed
3 large eggs
2 teaspoons vanilla extract
1 teaspoon butter flavoring
1/2 cup buttermilk
1/2 cup cream soda
Preheat oven to 350 degrees F (175 degrees C). Line a cupcake tin with baking cups.
In a medium bowl, whisk together the flour, baking powder, baking soda, and salt. Set aside.
In a large mixing bowl, beat together the butter and brown sugar until light and fluffy. Add the eggs one at a time, beating well after each addition. Beat in the vanilla extract and butter flavoring.
Fold in 1/3 of the flour mixture, then the buttermilk, 1/3 of the flour mixture, cream soda, and then the remaining flour. Folding in these ingredients will prevent over-mixing and will result in a fluffier, less dense cupcake. Fill cupcake liners 3/4 of the way full and bake for 15-18 minutes, or until the cupcakes are golden and spring back when touched. Cool completely before frosting.
Butterscotch Ganache
11 ounces (1 package) butterscotch chips
1 cup heavy cream
In a small saucepan on medium heat, melt the butterscotch chips into the heavy cream, stirring until smooth. Remove from heat and cool to room temperature before using.
Butterscotch Buttercream
6 tablespoons unsalted butter, softened
1/4 cup butterscotch ganache (recipe above)
1 teaspoon vanilla
1 teaspoon butter flavoring
Pinch of salt
3-3 1/2 cups powdered sugar
Splash of heavy cream (as needed)
In a large mixing bowl, beat the butter until light and fluffy. Mix in the butterscotch ganache, vanilla, butter flavoring, and salt. Beat in the powdered sugar for 2-3 minutes, starting with 3 cups and adding more only if necessary. Add the cream a tablespoon at a time until desired consistency is achieved (I only needed 1 tablespoon).
To Assemble
Pour butterscotch ganache into a plastic squeeze bottle. Stab the tip of the bottle into cupcake and fill each cupcake with butterscotch ganache until it starts to overflow.
Fill a pastry bag with butterscotch buttercream and pipe onto the top of each cupcake. Drizzle on the butterscotch ganache. Lick your fingers clean if you just so happen to get extra butterscotch on them. If you have any leftover butterscotch ganache, it can be used as ice cream topping.
Store in an airtight container at room temperature (that is, if they don't get devoured immediately).


Monday, July 11, 2011

Baked Potato + Vegetables = Delicious


I haven't overhauled my diet completely, but I have been trying to make a more conscious effort to eat more fruits and vegetables everyday instead of other.... garbage. I'm in no way becoming a vegetarian, but I am pretty sold on the idea of doing several vegetarian meals during the week, and limiting meat intake to become more of a side dish instead of a main course. (That is, unless I ever get the idea in my head to make a meal for a man... because I know that men are carnivorous.)

My good friend Kira made a dinner a few months ago that she discovered on Pinterest.com that involved a baked potato, bell peppers, and zucchini. She stir fried the vegetables with olive oil and soy sauce, and it was really delicious. I vowed never to smother my baked potato in cheese and sour cream ever again.

So I had the intention of recreating the meal a few nights ago when I realized that I had used all my bell peppers for my stir fry (that I had made the night before -- which means, yes, I cooked myself a dinner, a real dinner two nights in a row). Anyway, I looked through my fridge and decided to try something a little different.

While my potato was cooking (in the microwave), I put some broccoli on to steam. I cut up the zucchini, a tomato and a jalapeno and threw it in a skillet with olive oil that had dehydrated onions already mixed in. Topping it with salt, pepper and a little bit of garlic... WAH-LAH! It was a culinary masterpiece.

I did put cheese on my potato.... but I don't know that it was entirely necessary.

Sunday, January 02, 2011

Home-Made Doughtnut Goodness

Mom and Mackenzie making doughnuts
Probably not the healthiest of recipes...but good grief! They're delicious. My mom makes them every year for Christmas Eve, but this year, they waited until we could all enjoy them together.

It was the first time this whole time I've been home that the eight of us have been in the same room.

Doughnuts:

1 package yeast
2 tbsp warm water
3/4 C warm milk
2-1/2 bread flour (divided)
1/4 C sugar
3 tbsp shortening
1/2 tsp salt
1/8 tsp cinnamon
1/2 tsp nutmeg (we prefer it without)
1 egg

Dissolve the yeast in the warm water in a large mixing bowl. Let stand 5 minutes. Add milk, 1 cup flour, and next 6 ingredients; beat mixture at medium speed of an electric mixer 2 minutes or until blended. Stir in remaining 1-1/2 cups flour. Cover and let rise in a warm place (85 degrees), free from drafts, 1 hour or until doubled in bulk.

Punch dough down; turn out onto a well-floured surface, and knead until smooth and elastic. Roll dought to 1/2-inch thickness, and cut with a 2-1/2-inch doughnut cutter. Place doughtnuts on a lightly floured surface. Cover and let rise in a warm place, free from drafts 20 to 30 minutes or until doubled in bulk.

Pour oil to a depth of 2 to 3 inches into a pan. Heat to 375 degrees; drop in doughnuts (4 at a time, or so). Cook 1 minute or until golden on one side; turn and cook other side until golden. Drain well. Dip each doughnut into white glaze while warm and place place on wire racks, letting excess glaze drop off.

Yield: one dozen

White Glaze:

3 tbsp butter
1 tsp vanilla
3-4 cups powdered sugar
water to consistency of a thin-thick batter (yes, I said thin-thick...)

Thursday, January 28, 2010

Moving Day

I've been telling the guys at work that I am moving since...November. I am fairly certain that is when I signed my contract in order to move in Single Tree. I paid the deposit. The next month I paid my first month's rent (for January) and I even dropped by once or twice on occasion. The guys would all ask if I liked my new place, my new ward, my new roommates, etc. Only, I never moved out. So I couldn't tell them anything.

One day, Wes offered to help me move. It was out of genuine good-will. Now, I hate moving. And I hate moving other people more...so I really hate asking people to help me move. BUT - moving is also hard work, and not something that can be accomplished alone. When I move, I always wish I were part of the wealthy gentry back in the 19th century and had house servants to pack, clean and move all of my things. Because boxes of books are heavy. Furniture is heavy. And organizing is a pain. I have a lot of friends who have offered to help, but I hate asking because none of them drive trucks and they are busy with school and work of their own.

But the guys at work drive trucks. Big trucks. And they are guys. They offer to help me carry the 70lb box of paper and all the pop I buy them. And I never take them up on it, because even though I'm not a feminist, I am not completely worthless, either. I can handle paper and pop - But I totally let them take care of the armoire and the bookshelf and the other boxes that I am so sick of looking at.

I bribed them with pizza. They had already offered to do it, but I still wanted to make it worth their while, after all, they were giving up their lunch hour to help me. They didn't expect it, so that was more incentive to get them lunch. And then Kevin ended up offering to pick up the bill, anyway. So....that was really nice. We went over to the house and they had everything loaded in 15 minutes. We drove the three blocks to my new, more ghetto apartment, and they had everything unloaded in another 20. They even rearranged my room for me.

"We want to know what's in the big giant Victoria Secret box," Rob says as spokesmen for the group.
"Yeah, Rob really wants to open that," says Todd.
"I don't know guys. I think that would really make our make our work relationship a little uncomfortable," I replied, laughing - knowing that there was a nun costume and pirate costume in the box and not lingerie. But still imagining the comments that would come up because of the nun habit.


There was something very...gratifying having five guys helping me move. Did I mention that I love working here? They are so funny and so nice. (Well, nice probably isn't the best word for them...) Obliging? I wonder what the couple of girls that walked home from classes and saw these two trucks with five guys carrying box after box - they must think that I'm insane to have that much stuff. Even though, it really doesn't seem like much.

They were carrying in my armoire and had to tip it to go up the stairs, and Rob is like, "CAREFUL, Rob has junk down there!"
Todd quipped, "But not much, so it's ok."
"At least a handful," Rob insists, "And YOUR hand was way too close," (he was talking to Wes).
"For heaven's sakes, I wasn't anywhere close to that," Wes insisted.
"Close enough," Rob said.

And then we came back and had pie - because William helped me make three pies last night and the crust actually turned out! This is thrilling for me, because I have never really made a good crust. And finally, I've learned most of William's secrets. And I'm just so pleased with the crust that I can't even stand it. If the guys hadn't told me that it was good - I would have been sad. But they liked it. I made Derby Pie, which, is basically like a giant chocolate chip cookie. I didn't bake it long enough, so it is a little more liquidy than I would have preferred - however, I did add walnuts to it. Can I just say that nuts are really delicious? They totally made the pie 68% better. (Sorry, Mackenzie... you can't have Derby Pie with walnuts, but I recommend it for EVERYONE else.)

Ingredients
  • 1 stick butter
  • 1 pdg. chocolate chips (small)
  • 1/2 c. flour
  • 1 c. sugar
  • 2 eggs well beaten
  • 1 tsp. vanilla
  • 1/2 c. nuts
Directions
  1. Melt butter, add chocolate chips, mix flour and sugar.
  2. Add eggs, vanilla, and nuts.
  3. Pour into unbaked pie shell and bake 25 minutes in 350 degree oven.
*I baked my pies for 45 minutes, and it still didn't seem like enough. I also mixed everything differently, but that's because I didn't know how... so I guess this works.


I'm now 93% of the way moved in. And I might even sleep in my new apartment....tomorrow.

William's Pie Crust

William taught me the secrets to making a delicious pie crust, and I thought that it should be shared. I don't know what it is about him teaching me things, but...he's a brilliant instructor. (William - I hope you don't mind that I am sharing this...)

William’s Crust for a 9” Double Crust Pie 
    2 cups flour
    1 cup shortening
    ½ cup very cold water
    1 teaspoon salt
  • Mix the flour and salt in a medium mixing bowl to achieve a uniform dispersion.  Cut shortening into flour to make a heterogeneous mixture of shortening globules coated with flour (shoot for a mean volume of approximately 25 microliters – approximately the volume of a pea). 
  • Distribute the water evenly over the mixture and stir until just incorporated.  Do not overwork the dough or it will be tough.  The objective is to achieve a visually homogeneous pastry dough that actually consists of many pockets of shortening held together by a flour-water structure, while forming as little gluten as possible by not overworking the dough.  This results in a delicate, flaky crust. 
  • If possible, refrigerate the crust until chilled (at least 1 hour, optimally 3 – 4 hours).  This will solidify the fat, yielding a stiffer, easier to work with dough.
  • To roll out the dough, begin by forming an even disk (press into a ball, and then form the disk) with an approximate 3 inch radius.  The more uniform the shape and smooth the boundary the better will be the result.  Roll evenly from the center outward to obtain an even disk with radius 1 – 2 inches larger than the radius of the pie dish.  Place in pan and fill.  Trim the bottom crust even to the edge of the pie pan with a sharp knife. 
  • After rolling out the top crust in a similar fashion, moisten the rim of the bottom crust with a small amount of water so that the two crusts will seal together.  Trim the top crust to have approximately ¾ inch extra crust beyond the bottom crust.  Fold this excess crust under the lip of the bottom crust.  Gently mold the edge to achieve uniformity and flute extravagantly.
William also has several secrets to making crusts.

There are several:

Secret #1: The recipe
Use the recipe attached.  It has more shortening than some recipes and yields a very delicious crust.

Secret #2: Use the right ingredients
Crisco is worth buying.  Store brands do not taste as good.

Secret #3: Do not overwork the dough
This is the most important.  When you cut in the shortening don't mix it--you only want small pieces coated in flour.  When adding the water stir until just barely mixed.  Overworking it makes it tough and not flaky.  I use a rubber spatula to stir in the water.  Don't roll it out more than once.  Rolling it out develops gluten, which also makes it tough.

Secret #4: Refrigerate the dough
This makes it easier to work with when you are rolling it out.  An hour at least, but 3-4 is better.

Secret #5: Roll it out well.
Shape the crust into a sphere by pressing it (don't overwork it).  Flatten into a disk that is an inch thick.  Use your hand to smooth the edges so that the disk has even edges.  Then as you roll gently from the center outward in all directions it will roll out into a nice even circle.  After the circle has not quite doubled in diameter, pick it up and re-flour the surface or it will stick.  If it stops expanding in size when you are rolling, then you need more flour on the counter.  Don't roll it any bigger than you need to, as you want it to be as thick as possible.

Secret #6: Leave it kinda thick
If you are making a double crust 9" pie the attached recipe is the right amount.  If you are making a single crust, I'd 3/4 it rather than 1/2 it.  If you are making anything larger than 9" you might want to make more.  You want it to be nice and thick.

Secret #7: Make the edge thicker
If you are making a double crust, cut the bottom crust trim to the edge of the pan.  Moisten the edges to seal.  Cut the top crust an inch wider than the pan.  Then fold the top crust under the bottom crust.  Then flute.  This makes the seam better and the crust thicker.  If you are making a single crust, cut it an inch wider than the pan and fold it under to make the edge twice as thick.  Then flute.

Saturday, January 16, 2010

Nigeria Invades...a slamming party

Becca and I heard about this huge party going on in Lindon earlier this week and we couldn't decide whether or not to go. The fact that it cost money and wasn't really something that many of our friends would want to do were kind of a hindrance. That and we have both been a little stressed and tired as of late.

Regardless, on Wednesday we decided that we were going. We tried to invite people, but it turns out that our friends are the masters of excuses. The guys were all mad that they had to pay more. We did get a good little group together, though, so the party was on!

We arrived at Noah's just in the nick of time so that we paid a cheaper price and actually found room on the dance floor. After a couple of hours, the place was crawling with about 1500 people. The DJ was...OK. Some of the songs were really good, and some of the mixes were really awful. We met up with some great girls and danced in our little circle for most of the night. At one point, as I was dancing, I made eye contact with a very little African guy (we kept saying he was from Nigeria, but I don't think any of us asked...so there is no way of knowing) and he started dancing with me. Only, it was the type of dancing that I had previously been barfing over, so I tried to escape. Luckily I saw a guy I knew and I used that as an exit. The little Nigerian friend found me another two times before I finally got away and that wasn't before he also danced with Becca and Kelly. Of which, our friend Wyatt had to actually cut in, in order to save Kelly from his clutches!

A few other guys cut in and danced with us from time to time. One of the guys I had been checking out...pretty much all night. So even though we danced for only a song, I felt like I had totally accomplished something by him backing that thang up.... yeah, it was pretty awesome.

It turns out that the whole Sluts of Utah County chapter was in attendance, and our little group definitely got an eye sore of watching dirty sex-dancing. And making out. Now, I am all for a little PDA, but full blown make out sessions on the dance floor, where you were previously bumping and grinding is cause for hurling. I think we were all lucky that we didn't lose our dinner.

Speaking of which, I made a delicious dinner prior to the dance. Thanks to Sabrina, who made it for me over Christmas, I have the recipe:

Ingredients:
4lbs boneless/skinless chicken breasts
1 can (16oz) whole berry cranberry sauce
1 bottle (8oz) kraft Catalina dressing
1 env. Onion soup mix. We used mrs. Grass onion soup mix

Directions:
Heat oven to 350F
Place chicken (13x9in) baking dish
Mix remaining ingrdients; pour oven chicken
Bake for 50 mins. Or until chicken is done (165F) 


The major things that were strange about the evening were the lack of fire safety. I think if there had been a fire, there probably would have been about 1450 deaths. The place was packed, and there weren't very many exits or maneuverability.

I was more in the mood for dancing than Becca was - that is probably the weirdest thing of the whole night. I could have danced for another hour, and Becca was ready to leave at 11 p.m. and then insistent that we leave at midnight.

So we did leave, and then we hit up Sammy's and then we stayed up really late. It was awesome and fun. And I haven't had that much energy in a long time. I could have danced all night, and almost did.

Monday, December 21, 2009

Best one yet: Pistachio Cheesecake


Ingredients

  • 2 cups all-purpose flour
  • 1/2 cup ground almonds
  • 1/2 cup cold butter
  • 6 packages (8 ounces each) cream cheese, softened
  • 1 can (14 ounces) sweetened condensed milk
  • 2 packages (3.4 ounces each) instant pistachio pudding mix
  • 5 eggs
  • Chocolate syrup
  • Whipped cream and chopped pistachios, optional

Directions

  • In a small bowl, combine the flour and almonds; cut in butter until crumbly. Press onto the bottom and 1-1/4 in. up the sides of a greased 10-in. springform pan. Bake at 400° for 10 minutes.
  • Meanwhile, in a large bowl, beat cream cheese, milk and pudding mixes until smooth. Add eggs; beat on low speed just until combined. Pour over crust. Place pan on a baking sheet. Reduce heat to 350°. Bake for 55-60 minutes or until the center is almost set. Cool on a wire rack for 10 minutes. Carefully run a knife around edge of pan to loosen; cool 1 hour longer. Refrigerate overnight.
  • Remove sides of pan. Slice cheesecake; drizzle slices with chocolate syrup. Garnish with whipped cream and pistachios if desired. Yield: 12 -14 servings.
In August I spent a week in Kentucky working for my Uncle Ivan. While there, my cousin Quin and I went to Baskin Robbins or some such ice cream place and I got pistachio ice cream. It was delicious. And it made me think of how awesome a pistachio cheesecake would be. About a month later, I went to Barnes and Noble and contemplated buying a cheesecake recipe book - mostly because there was a recipe for pistachio cheesecake.

So I've been craving this for a while.

In a previous post, you read that I auctioned off my amazing cheesecake-making capabilities at our ward service auction. Having done so, I bought the cream cheese while it was on sale and waited to be told what kind and for who exactly. Only, I haven't heard anything, so I decided to make the above recipe for the guys at work. They've been showering me with presents and treats and sveets (read: sv-eets) all last week and this morning so much that my blood has turned to syrup, so I thought I would make it up to them.

The recipe is pretty good. I would change only two things. I did not like the almond crust. It was way too chalky (probably my fault) and actually too thick (also, my fault). I usually like a thicker crust, but this wasn't the best. In fact, I would change it to be more like the crust my mom uses for her barber shop dessert. It's basically the same thing, only pecans instead of almonds and probably more butter. Or, a graham cracker crust would be good too.

The other thing I didn't like was the fact that the pistachio flavor is so subtle. You could probably add a third package of the pudding, or some pistachio extract (do they make that?) or something - maybe put some chopped nuts in before you bake it. Make sure that you mix the ingredients really well, because there isn't a lot of liquid (zero liquid, except the eggs) and it isn't as runny as I've had before with baking other cheesecakes. That kind of frightened me, so I added an extra egg, which caused it to bake about two inches out of the pan. It didn't make a mess, just made it rise a lot higher and baked the top. I sort of over cooked it, but I took the time to cut that part off, so the inside was good.

I did not put chocolate on it - it would have killed me. But I did put a thick layer of cool-whip on before I put it in the fridge over night and garnished it with chopped pistachios and maraschino cherries. Which were both an excellent idea.

I think this is my favorite cheesecake to date. If your daughter isn't allergic to nuts (sorry, Mom) I would recommend trying it!

Tuesday, June 16, 2009

Whoamazing Sandwich!

On the way back from Idaho, we stopped at the Crossroads Diner in Tremonton, Utah. It was really ghetto and while speculating how they could possibly stay in business we ordered sandwiches. The sandwich I got was fairly delicious. And easily recreated.

So after I dropped Becca off at the airport, I tried my hand at making my own awesome sandwich - and succeeded, exponentially.

  1. Sautee green peppers and onions
  2. Melt pepperjack cheese on top of creation
  3. Put turkey on whole grain bread
  4. Add green peppers and onions, and a little bit of spicy ranch dressing
  5. Return to pan to brown the bread
  6. Add tomatoes
Um...can I just say - DELICIOUS! I would say that maybe it was because I was starving and that was the reason this tasted so good. Perhaps it was the fact that I made it myself using whatever pans and dishes and making messes knowing that I could clean it up when I wanted to. But no, that is not the case. It was just simply delectable. Yum yum yum. I can't wait until tomorrow, so I can have it again!

Or why wait...maybe I'll just have a midnight snack.

Now I just have to come up with a name for this...

Thursday, April 02, 2009

Success...

Many moons ago, I tried a new recipe and it turned into a failed disaster. (Read about it by clicking my redundant description.)

I swore off all cheesecakes after that. Never was I going to pay money for all the ingredients, invest hours of my time and ultimately wind up with a giant mess under my stove top.

However, I've been dying to show my domestic prowess in the last few weeks, and let's face it - a homemade cheese cake is the exact way to do it. And so, the process began again. The cream cheese was on sale and I bought store brand graham crackers and made them chocolate myself (add cocoa powder and a bit o' sugar). I went cheap and then to make sure I wasn't sure what was the cost of ingredients, I bought a few other foodstuffs to last for the rest of the week.

It's always risky trying a new recipe, but I found a Red Velvet Cheesecake that was begging to be made on the series finale of ER. (Blood red, anybody?) And so, I did it.

And it was a success.

Or, at least it looks successful. We'll have to taste it during our ER party tonight.

*************
Prep: 20 min.; Bake: 1 hr., 25 min.; Stand: 1 hr.; Chill: 8 hrs. The cheesecake's deep red filling and snowy topping is wonderfully dramatic. Fresh mint sprigs add a pop of Christmas color.

Yield

Makes 8 to 10 servings

Ingredients

  • 1 1/2 cups chocolate graham cracker crumbs
  • 1/4 cup butter, melted
  • 1 tablespoon granulated sugar
  • 3 (8-ounce) packages cream cheese, softened
  • 1 1/2 cups granulated sugar
  • 4 large eggs, lightly beaten
  • 3 tablespoons unsweetened cocoa
  • 1 cup sour cream
  • 1/2 cup whole buttermilk
  • 2 teaspoons vanilla extract
  • 1 teaspoon distilled white vinegar
  • 2 (1-ounce) bottles red food coloring
  • 1 (3-ounce) package cream cheese, softened
  • 1/4 cup butter, softened
  • 2 cups powdered sugar
  • 1 teaspoon vanilla extract
  • Garnish: fresh mint sprigs

Preparation

Stir together graham cracker crumbs, melted butter, and 1 tablespoon granulated sugar; press mixture into bottom of a 9-inch springform pan.
Beat 3 (8-ounce) packages cream cheese and 1 1/2 cups granulated sugar at medium-low speed with an electric mixer 1 minute. Add eggs and next 6 ingredients, mixing on low speed just until fully combined. Pour batter into prepared crust.
Bake at 325° for 10 minutes; reduce heat to 300°, and bake for 1 hour and 15 minutes or until center is firm. Run knife along outer edge of cheesecake. Turn oven off. Let cheesecake stand in oven 30 minutes. Remove cheesecake from oven; cool in pan on a wire rack 30 minutes. Cover and chill 8 hours.

Wednesday, June 18, 2008

SHOOT!


I am NOT a scullery maid.

And yet somehow tonight, though my plans had not been made for it, I turned into one. This does not make me happy.

I started my evening by calling my mom and asking her for a "cheap" dessert that I could make for tonight's (as it is now after midnight) dessert night/party. There were a few suggestions, but I declined them all. Dessert nights/parties require one thing: cheesecake. And so I headed to the grocery store, for the second time this week, and picked up the ingredients to make a cheesecake. Now, I'm sure I threw in a few other things... No. I take that back. I paid $23 for my ingredients. Splurging on things like a box of graham cracker crumbs instead of actual graham crackers, that I would have to crumb myself, and a bag of chocolate chips - just in case.

After a very fun, and social, Ward Activity at Rock Canyon Park (which I had never been to) I started my adventures in the kitchen. I looked up a new recipe, as I didn't buy anything to put on top of a New York style cheesecake, and didn't have ingredients for the 2 that I have in my "cookbook" and found one that I was most excited about - Peanut Butter Cheesecake. Mmmm... I double checked to make sure I had all the ingredients and then set to work.

I should have known that cheesecake was not in the cards for me tonight when I didn't have the recipe that I was originally going to make. But that isn't unusual, so when I opened my cupboard and noticed that the plate to my 9-inch springboard pan was missing, I should have given up. Instead, I opted for the next biggest size and DOUBLED the recipe. When doubling the recipe, I noticed that I didn't really have enough graham cracker crumbs, but it seemed to work out and so I pressed on. I should have seen that the foil covering the springboard pan was trouble and that the lack of a roasting pan for a water bath would have caused problems. The fact that this cheesecake required a half hour longer than normal should have also been a tipoff to the problems ahead. But I pressed on. Ignoring the fact that there wasn't enough room in my mixer, and that contents could have easily overflowed at any point. Still, I beat the cream cheese (all 6-8oz bars) and poured the delicious concoction. I knew I had chosen a winner! It smelled so good, it looked so fantastic.

I put the decadent dessert into the oven and set the timer. I was enjoying Ashley's company and reading Harry Potter (and the Order of the Phoenix) and noticed that it was already 11:00 pm. Knowing that I would be up a while, I settled in and got comfortable.

When the buzzer rang, I eagerly got up to see the masterpiece. Now, when you are baking cheesecakes, there is a very difficult way of determining when they are done baking. I still haven't figured it out completely, but I've been more successful than not - so I keep trying. The buzzer went off and I looked to see whether my cheesecake jiggled like set custard or not. It seemed to and I removed it from the oven.

This is where the problems arise. When I am trying a new recipe, I ALWAYS follow it to the letter of the law. Modifications can come as you've gained more and more experience with that recipe, knowing what works and what doesn't. The recipe told me to allow the cheesecake to cool for 15 minutes and then remove the spring. So, I set the timer for 15 minutes and returned to Harry.

When the buzzer rang, looked at the delicious thing I had just created! It was magnificent. I knew that I would impress all the boys that will be coming tonight to honor my roommate Jaynann, and make all the girls jealous at my ability at being a domestic goddess.

But that's when the domestic goddess idea was squelched, and the Scullery Maid appeared. As I removed the spring from around my wonderful cheesecake, I could see that it wasn't completely set up. This is quite normal for me, as I rarely get the cheesecake baked to perfection. As if it had happened in slow motion, the filling of the cheesecake began to ooze from the middle. The lava of sugar, cream cheese, and eggs quickly overtook one burner and then another. I watched in horror as the entire cake deflated and created a disaster on my stove top. How any body can watch $23 and 2 hours of work deflate and NOT swear, I don't know. But all I said was, "Shoot." (It's hard to believe, I know. But really, the other words came later...) Shoot - and then it was gone. Apparently, I was only supposed to be removing the spingboard pan from the non-existent water bath. SHOOOOOOT.

And that's how I'm going to be serving $25 milkshakes. Because I am not letting this go to waste. I will be picking up a gallon of ice cream on the way home tomorrow, and we are having Peanut Butter Cheesecake Milkshakes. They will be divine. And I should charge for them.

Not ONLY was my cheesecake ruined beyond repair (there was never any hope of repair...) but I also had a GIANT mess to clean up; which, of course, did not include the dishes that I had dirtied while baking. The goo that was my cheesecake had spread into the burners. As I pulled each burner away, I noticed that the foil was old, and to my dismay the underside of the stove top looked like it had been baking random bits of food for over 2 years without having been cleaned. And that is how I became a scullery maid. I scrubbed as best I could without a Brillo pad or even 409, and didn't make any more progress than destroying the sponge beyond what I would allow to be used again.

There are few things that make me completely grossed out, but scrubbing an oven is one job that I have to be careful not to gag to the point of throwing up. It smells, and it's gross... Fewer people than Mom's have to clean such nastiness.

I'm so glad that I don't live in the 1500-1600s and have to work as a scullery maid, I would have died.

On that note, if you want to celebrate Jaynann with us, and have a peanut butter cheesecake milkshake - my place, at 9pm.

Anybody brave enough, try:

Peanut Butter Cheesecake

2 cups graham cracker crumb
8 tablespoons (1 stick) unsalted butter, melted and cooled
2 tablespoons packed dark brown sugar
1/2 teaspoon ground cinnamon
1/4 teaspoon salt
24 ounces regular or low-fat cream cheese (do not use fat-free)
1-1/3 cups sugar
1 cup creamy standard peanut butter
4 large eggs, at room temperature
1/2 cup regular or low-fat sour cream (do not use fat-free)
1 tablespoon vanilla extract
1. Position the rack in the center of the oven and preheat the oven to 350 degrees F. Wrap the outside of a 9-inch springform pan tightly in aluminum foil (this will keep the water in the water bath from seeping into the batter as the cake bakes); set aside.
2. Stir the graham cracker crumbs, melted butter, brown sugar, cinnamon, and salt in a large bowl until the graham cracker crumbs are thoroughly moistened. Pour a little more than half of this mixture into the bottom of the prepared springform pan and press it all the way to edges so that it coats the bottom of the pan. Pour the rest of the mixture around the inner seam of the pan, where the rim meets the bottom; press the crust halfway up the sides of the pan, filling in along the bottom where necessary. Set aside.
3. Beat the cream cheese and granulated sugar in a large bowl with an electric mixer at medium speed until smooth, about 2 minutes. If you rub a small bit between your fingers, you should feel only a few sugar granules. Beat in the peanut butter. Scrape down the sides of the bowl with a rubber spatula, then beat in the eggs one at a time, making sure each is thoroughly incorporated before adding the next. Finally, beat in the sour cream and vanilla.
4. Taking care not to disturb the crust, pour this mixture into the prepared pan. Smooth its top with a rubber spatula. Place the springform pan in a high-sided roasting pan that's large enough to accommodate it comfortably. Fill the larger roasting pan with hot water until it comes about halfway up the outside of the springform pan.
5. Bake until the cheesecake's top is dry and lightly browned and the cake jiggles like set custard when tapped, about 1-1/2 hours. Cool in the pan for 15 minutes, then remove the springform pan from the water bath and cool it completely to room temperature on a wire rack.
6. Remove the foil and cover the pan with plastic wrap, taking care not to press the wrap onto the surface of the cheesecake. Refrigerate overnight.
7. Unlatch the sides and transfer to a serving platter. If desired, run a long knife between the pan's bottom and the cake, then gently slide the cake onto the serving platter.

Search This Blog

Related Stories

Related Posts Plugin for WordPress, Blogger...